Types of Insulation | Where to Install | Bypasses | Ice Dam Formation | Sealing Bypasses | Vapor Barriers | Ventilation | Crawl Spaces Insulation Saves Two Ways Almost every homeowner can save both energy and money by adding insulation. Good insulation is permanent, maintenance-free, and can return your investment by lowering your fuel bills. The payback period varies with type of insulation materials, purchase and installation costs, and the price of fuel. The basic function of insulation is to resist the flow of heat. This is expressed as an "R" value; the higher the "R" value, the more resistance to heat flow. Insulation materials have different "R" values, so buy insulation according to the "R" value you wish to attain, not by total inches.
There are several types of insulation with various "R" values and prices. Some are easy to install yourself; others may require a contractor or special equipment.
NOTE: To assure fire safety, rigid insulation should be covered with 1/2" gypsum wallboard when installed. No matter what kind of insulation you buy, be sure it meets federal standards for fire and vermin resistance. Check for approval codes listed on the packaging.
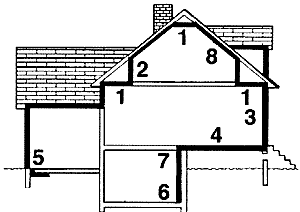
The list below tells you which places in your home need insulation. An unconditioned space is an area with no heat or air conditioning; a conditioned space is heated in winter and air conditioned in summer.
And don’t forget…
Installing insulation
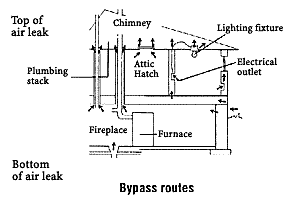
Besides insulating, caulking and weatherstripping, a very important step in weatherizing your home is finding and sealing bypasses. A bypass is any hole, crack or crevice that allows conditioned air to leak through your home’s insulation. Bypasses are found in interior and exterior walls, around vent pipes, recessed light fixtures, plumbing and electrical wire passages, and chimneys. Seal bypasses before insulating; if your attic is already insulated or floored, you may have to remove insulation or floor boards to plug the bypasses. If bypasses are not sealed the insulation only "filters" the warm air on its way to the attic, and your roof will still be warm, and will possibly develop ice dams.
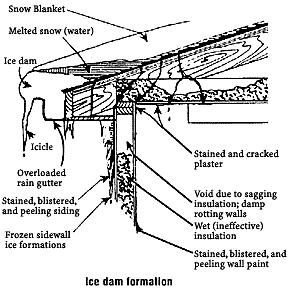
Ice dams form when heat enters an attic and melts snow on the roof. This melted snow (water) runs down the roof, under the blanket of snow, to the edge of the roof where colder conditions cause it to freeze, forming ice dams. If ice dams are not removed, water may be caught behind them, forced under shingles or spill over to form icicles. This can result in costly damage to your home: wet (ineffective) insulation; stained or cracked plaster or sheet rock; damp, rotting walls; and stained, blistered or peeling paint.
Preventing ice dams Since the basic cause of ice dams is a warm roof, the solution is to maintain a cold roof. You can take three steps to achieve a cold roof:
Notes:
Temporary or emergency measures If you already have water or ice dam problems, you need to take remedial action. The following methods are sometimes successful but will probably have to be repeated with every winter storm.
Remember, these are only temporary or emergency measures. The most effective way to prevent ice dams is by sealing bypasses, properly insulating the attic floor, and adequately ventilating the roof area.
Techniques for sealing bypasses depend on the size and accessibility of the openings. Regular caulk can be used for small holes. Holes too large or deep for regular caulk can be sealed with foam caulk or void filler. Open wall cavities and other large openings can be sealed with pieces of rigid material cut to fit and caulked into place, or stuffed with lightly rolled unfaced fiberglass insulation.
Humidity and moisture that collect in insulated areas can cause problems. Therefore, vapor barriers should be placed between insulation and the conditioned space. Suitable vapor barriers can be found on some blanket insulations. Where no vapor barrier is attached, a separate vapor barrier made of the following materials works well:
Notes on Vapor Barriers
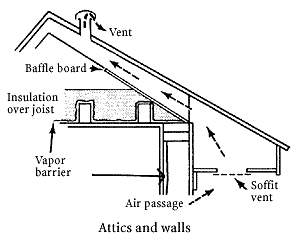
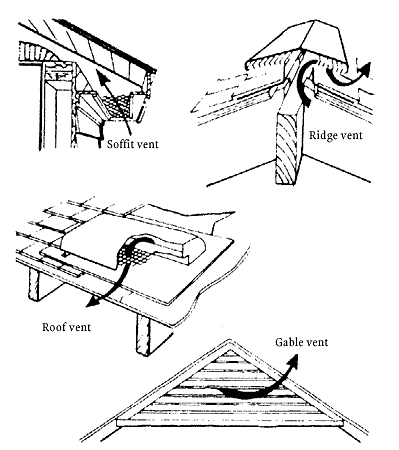
Vents are openings in the attic area that allow moisture to escape. If you don’t ventilate properly, water vapor can condense and collect on insulation and rafters. This will reduce the effectiveness of the insulation and could damage the house. Also, without ventilation, attic heat could penetrate into living areas during summer. Where and how much How much ventilation you need is determined by the area of your attic; normally one square foot of vent is needed for every 300 square feet of attic area. If you do not have a vapor barrier in this area, the amount of ventilation could be doubled (up to one square foot of vent for every 150 square feet of attic area). Keep in mind that screens and louvers on vents reduce venting capacity, so openings must be increased proportionately. Use a combination of vents, half located low on the roof and half higher up, so air can flow in one and out the other. For example, use soffit and ridge vents. Install baffle boards as necessary to prevent insulation from blocking air flow. Keep vent screens clean.
Power ventilation Natural ventilation is usually sufficient. Using electrically powered vents is optional. Power vents require additional attic ventilators and they may interfere with proper furnace and fireplace venting. Be sure you choose the correct size power vent to handle the area.
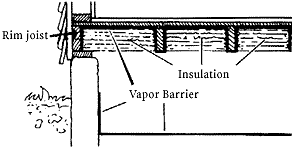
Unconditioned crawl space Crawl spaces require insulation, ventilation and vapor barriers. In unconditioned crawl spaces one vapor barrier covers the ground and another covers the area between the insulation and subfloor. The insulation is installed between the floor joists. (Refer to illustration.)
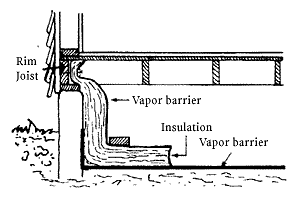
Conditioned crawl space If a conditioned crawl space is desired, a vapor barrier covers the ground in the same way as in the unconditioned crawl space. Insulation is applied to the rim joist, down the wall and onto the floor, so a vapor barrier should also be installed to cover the insulation. (Refer to illustration.) In all cases, be sure to insulate water and drain pipes and heat ducts in the crawl space.
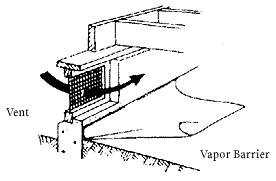
Foundation vent If the crawl space opens into a conditioned basement or cellar it should be ventilated to the outside (one square foot of vent for every 1,500 square feet of floor area) with vents placed on opposite walls for cross ventilation. These foundation vents can be closed and sealed in winter and opened in warm weather.
|
|||||||||||||||||||||||||||||||||||||||||||||||||||||||||||||||||||||||||||||||||
